Tech Talk Session 5

A million requests per second with Python

Is it possible to hit a million requests per second with Python? Probably not until recently.

A lot of companies are migrating away from Python and to other programming languages so that they can boost their operation performance and save on server prices, but there’s no need really. Python can be right tool for the job.

The Python community is doing a lot of around performance lately. CPython 3.6 boosted overall interpreter performance with new dictionary implementation. CPython 3.7 is going to be even faster, thanks to the introduction of faster call convention and dictionary lookup caches.

For number crunching tasks you can use PyPy with its just-in-time code compilation. You can also run NumPy’s test suite, which now has improved overall compatibility with C extensions. Later this year PyPy is expected to reach Python 3.5 conformance.

All this great work inspired me to innovate in one of the areas where Python is used extensively: web and micro-service development.

Enter Japronto!

Japronto is a brand new micro-framework tailored for your micro-services needs. Its main goals include being fast, scalable, and lightweight. It lets you do both synchronous and asynchronous programming thanks to asyncio. And it’s shamelessly fast. Even faster than NodeJS and Go.

Python micro-frameworks (blue), Dark side of force (green) and Japronto (purple)

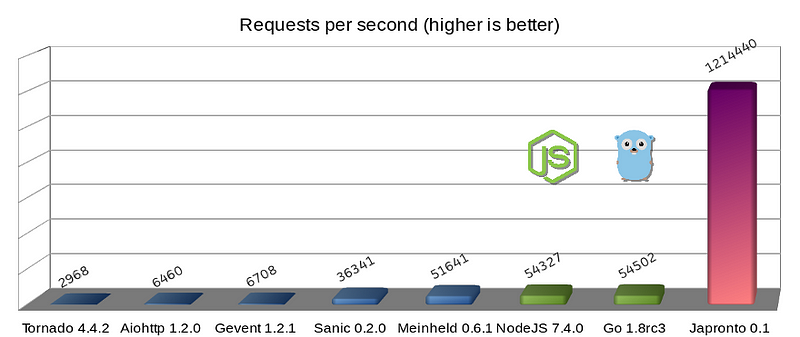
Errata: As user @heppu points out, Go’s stdlib HTTP server can be 12% faster than this graph shows when written more carefully. Also there’s an awesome fasthttp server for Go that apparently is only 18% slower than Japronto in this particular benchmark. Awesome! For details see https://github.com/squeaky-pl/japronto/pull/12 and https://github.com/squeaky-pl/japronto/pull/14.

We can also see that Meinheld WSGI server is almost on par with NodeJS and Go. Despite of its inherently blocking design, it is a great performer compared to the preceding four, which are asynchronous Python solutions. So never trust anyone who says that asynchronous systems are always speedier. They are almost always more concurrent, but there’s much more to it than just that.

I performed this micro benchmark using a “Hello world!” application, but it clearly demonstrates server-framework overhead for a number of solutions.

These results were obtained on an AWS c4.2xlarge instance that had 8 VCPUs, launched in São Paulo region with default shared tenancy and HVM virtualization and magnetic storage. The machine was running Ubuntu 16.04.1 LTS (Xenial Xerus) with the Linux 4.4.0–53-generic x86_64 kernel. The OS was reporting Xeon® CPU E5–2666 v3 @ 2.90GHz CPU. I used Python 3.6, which I freshly compiled from its source code.

To be fair, all the contestants (including Go) were running a single-worker process. Servers were load tested using wrk with 1 thread, 100 connections, and 24 simultaneous (pipelined) requests per connection (cumulative parallelism of 2400 requests).

Tech Talk Session 4

Material Design and the Mystery Meat Navigation Problem

In March 2016, Google updated Material Design to add bottom navigation bars to its UI library. This new bar is positioned at the bottom of an app, and contains 3 to 5 icons that allow users to navigate between top-level views in an app.

Sound familiar? That’s because bottom navigation bars have been a part of iOS’s UI library for years (they’re called tab bars in iOS).

Left: Material Design’s bottom navigation bar | Right: iOS’s tab bar

Bottom navigation bars are a better alternative to the hamburger menu, so their addition into Material Design should be good news. But Google’s version of bottom navigation bars has a serious problem: mystery meat navigation.

Whether you’re an Android user, designer, or developer, this should trouble you.

What’s mystery meat navigation, and why’s it so bad?

Mystery meat navigation is a term coined in 1998 by Vincent Flanders of the famous website Web Pages That Suck. It refers to buttons or links that don’t explain to you what they do. Instead, you have to click on them to find out.

(The term “mystery meat” originates from the meat served in American public school cafeterias that were so processed that the type of animal they came from is no longer discernible.)

Tech Talk Session 3

This is tech talk session 3Build a Node.js API in Under 30 Minutes

Node.js can be intimidating to beginners. But its flexible structure and lack of strict guidelines makes it seem more complicated than it is.

This tutorial is a quick and simple guide to Node.js, the Express framework, and MongoDB, focusing on the fundamental REST routes and basic database interaction. You’ll build a simple API boilerplate that can then be used as the foundation for any app.

Who This Tutorial Is For: You should have a basic understanding of REST APIs and CRUD operations, plus basic JavaScript knowledge. I use ES6 (mainly fat-arrow functions), but nothing too complex.

For this tutorial, you’ll create the skeleton of a back-end for a note-taking application — think Google Keep. You want to be able to do all four CRUD actions on your notes: create, read, update, and delete.
Setting Up

If you don’t have Node installed, see here.

In a new directory, run npm init, and follow along with the prompts, giving your app the name of ‘notable’ (or whatever else you might like).

npm init

Once that’s done, you should have a package.json ready to go in your directory. This means you can start installing the dependencies you need for your project.

You’re going to use Express as your framework, MongoDB as the database, and a package called body-parser to help deal with JSON requests.

npm install –save express mongodb body-parser

I also highly recommend installing Nodemon as a dev dependency. It’s a simple little package that automatically restarts your server when files change.

If you run:

npm install –save-dev nodemon

You can then add the following script to package.json:

// package.json

“scripts”: {
“dev”: “nodemon server.js”
},

Your complete package.json should look like this:

// package.json

{
“name”: “notable”,
“version”: “1.0.0”,
“description”: “”,
“main”: “server.js”,
“scripts”: {
“dev”: “nodemon server.js”
},
“author”: “”,
“license”: “ISC”,
“dependencies”: {
“body-parser”: “^1.15.2”,
“express”: “^4.14.0”,
“mongodb”: “^2.2.16”
},
“devDependencies”: {
“nodemon”: “^1.11.0”
}
}

Now you can create your server.js file and start building your API.

Tech Talk Session 2

How to integrate Stripe payment gateway in laravel

Hello laravel enthusiasts, welcome back. Here I am going to discuss on something very exciting. You will know how to integrate stripe payment gateway in laravel applications.

Why Stripe ?

There are so many payment gateways available, one of the most popular gateways is PayPal, but Stripe has some advantages over PayPal — simple, hassle free, easier integration, setup, maintenance and seamless checkout experience. Moreover integrating stripe with laravel is a breeze.

We just need a payment form which collects card information like card number, expiry date and a CVC code. When these details are sent to stripe it validates and returns a token which is used to process the payment.

Getting started with Stripe

  • First, we need to register with stripe, go to stripe and register yourself there.
  • Now get the public and private keys from your account which are provided in your account settings.
  • Make sure you set your stripe account as a test account so that real transactions does not occur.

While in test mode, we cannot use genuine card information, so it provides us with some test cards,

Tech Talk Session 1

This video walks you through the various ways you can use the asset generator in Photoshop CC to output images in different sizes and resolutions for use in other projects.
Chris Converse

How to create and generate web graphics with Adobe Generator, see Extract Assets for the web.

Generate image assets from layers or layer groups

To understand the image asset generator better, consider a simple PSD file (download from this link) with the following layer hierarchy:

Photoshop generate image assets

Example PSD file and its layer hierarchy


The layer hierarchy for this file has two layer groups—Rounded_rectangles and Ellipses. Each of these layer groups contains five layers.

Follow these steps to generate image assets from this PSD file:

  1. With the PSD file open, select File > Generate > Image Assets.
  2. Append appropriate file format extensions (.jpg, .png, or .gif) to the names of the layers or layer groups from which you want to generate image assets. For example, rename the layer groups, Rounded_rectangles and Ellipses, as Rounded_rectangles.jpg and Ellipses.png; and the layer, Ellipse_4 as Ellipse_4.gif.

Note:

The special characters : and * are not supported in layer names.

Photoshop generates the image assets and saves them in a subfolder alongside the source PSD file. If the source PSD file is not saved yet, Photoshop saves the generated assets in a
new folder on your Desktop.